第1章 背景
目前UniEAP Report 企业版本与应用系统间推荐的集成方式是使用第三方单点登录系统进行单点登录集成,而Apereo CAS是目前Java服务器环境下使用最为广泛的单点登录系统。基于此情况,本文对Apereo CAS 单点登录系统的基本使用进行一些基本介绍,以方便不了解Apereo CAS的项目开发人员上手搭建Apereo CAS单点登录,利用CAS实现应用系统与UniEAP Report的单点登录集成。
本文基于目前UniEAP Report项目组的使用经验并参考网站资料编写而成,由于CAS发展多年,可配置内容非常多,本文仅会包含Apereo CAS系统的基本配置使用作为使用CAS的基础,并涉及少量原理性内容。对于本文没有涉及的使用方法及使用方式,请参考Apereo CAS 在GitHub上的文档: https://apereo.github.io/cas 或参考网上其他人编写的资料。
第2章 CAS介绍
2.1 CAS版本
CAS 全称是Central Authentication Service(中心认证服务),它是一个单点登录(Single-Sign-On)协议,Apereo CAS是实现该协议的软件包。
CAS最初由Yale大学的Shawn Bayern开发实现,随后由Yale大学的Drew Mazurek负责维护,此时的CAS被称作 Yale CAS 。2004年,CAS成为了JASIG(Java in Administration Special Interest Group) 的一个项目,2008年起开始由JASIG负责CAS的维护,CAS被改称 JASIG CAS 。2012年,JASIG与Sakai Foundation合并为Apereo Foundation,此后CAS称为 Apereo CAS 。
CAS协议版本有3个版本,1.0,2.0和3.0。而Apereo CAS软件截至2018年11月底最新版本是5.3.6,支持CAS 3.0版本协议及其他SAML(部分支持)、OAuth等一些其他单点登录协议。
目前UniEAP Report可以支持 Apereo CAS 3.5(2015年)以上版本(更低版本理论上也可以支持,但年代过早不推荐使用),文档后续将基于 Apereo CAS 4.1.0版本进行说明。
2.2 CAS基本概念
2.2.1 总体运行过程
CAS 单点登录系统中,分为两方,一方为Apereo CAS服务端提供单点登录服务,一方为应用端作为CAS的客户端使用单点登录服务。
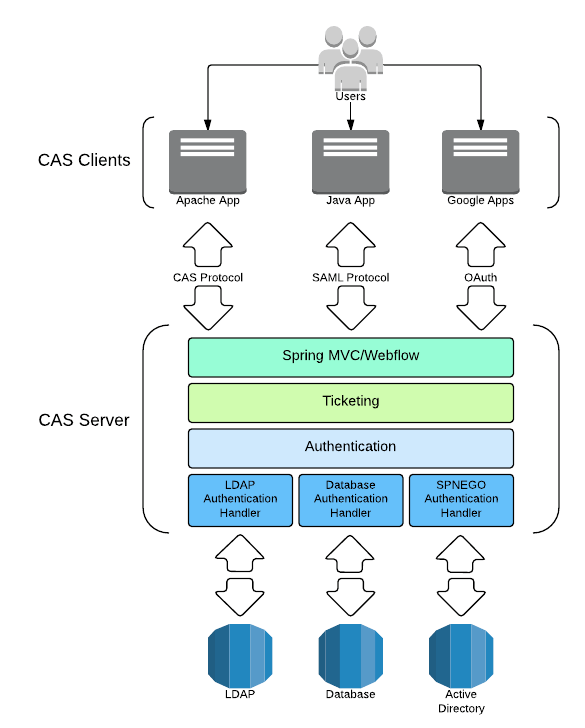
上图为CAS官网上的架构图(未包含浏览器端)。
在未采用单点登录前,用户登录在各自的应用端,每次访问应用均需要在各自应用上登录。
在采用CAS单点登录后,登录页在CAS服务端提供,CAS服务端负责读取用户信息进行登录认证,认证成功后,CAS服务会在会话(Session)中记录CAS登录信息。CAS客户端应用在需要登录时,自动从CAS服务端安全获取到当前登录人,完成登录,并使用应用的会话(Session)记录当前登录信息。
登录过程可以由应用端(CAS客户端)发起,也可以直接访问CAS服务端发起。当由应用端发起时(例如用户访问了一个应用中需要登录认证的请求),会通过页面跳转方式跳转到CAS服务端(此时会有发起端的标识),待用户在CAS服务端认证成功后,页面自动跳回到原请求的应用端通知应用端获取登录人信息完成登录。
2.2.2 特点
CAS标准的单点登录使用过程具有如下特点:
分为两端:CAS认证服务端、CAS客户端(应用),用户认证及登录发生在CAS端;
发起者可以是CAS服务端,也可以是应用端;
CAS服务端与应用端各自保存认证后的结果到会话;
登录时会发生应用与CAS间的页面跳转;
应用端需要与CAS端直接通信,应用端会通过服务器后台通信访问CAS端进行验证。
第3章 CAS基本使用
由于CAS集成后,所有应用的登录都需要在CAS端(包含用户的认证、登录界面的自定义),因此除了示例系统,正式的CAS集成总是会需要进行CAS端的开发构建。
一般来说,可能需要开发的内容有几个方面:
1.登录界面
2.新的认证方式,如加密的登录密码
3.自定义认证成功后向客户端返回的信息,默认的实现是登录名
4.自定义的CAS客户端维护
构建CAS有几种方式:
1.下载打包好的war包,解压后,手动修改配置,二次开发的Java代码另行构建打包,手动放在部署的应用的WEB-INF/lib中;
2.下载CAS完整代码,修改代码和配置打包部署(官方不推荐);
3.官方推荐的WAR包Overlay方式。该方式需要使用maven或Gradle构建工具,在工程中依赖完整CAS war包,并在工程中手动添加需要修改的配置文件、页面或实现类,然后使用工具构建自动合并生成部署的war包。
第一种方式操作简单,但需要维护应用配置、Java代码并手动合并,且Java代码依赖也不易手动维护,因此这里说一下第三种方式。(第一种操作与一般应用开发部署类似,不再赘述)
3.1 下载WAR包
如果使用第一种方式,可以从maven网站下载所有版本的war包:
5.0之前的版本:
http://repo1.maven.org/maven2/org/jasig/cas/cas-server-webapp/
5.0之后的版本:
http://repo1.maven.org/maven2/org/apereo/cas/cas-server-webapp
使用War Overlay方式也需要一个war包,可以手动从该地址下载,也可以直接在工程构建时从gradle或maven下载后的本地库中获取。
3.2 Gradle WAR Overlay
这里介绍一个使用Gradle进行WAR Overlay开发构建的方法。
- Gradle:根据自己部署使用的JDK版本,推荐使用2.14.1或以上版本(下载位于https://www.gradle.org),下载后解压到某一路径下即可。
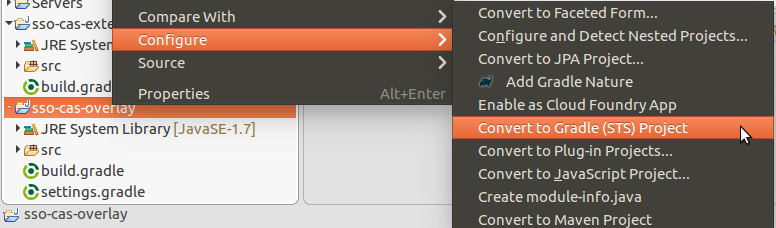
- Eclipse Gradle插件:可以使用Gradle STS Integration for Eclipse插件(可于Eclipse Marketplace中搜索Gradle IDE Pack下载安装,或添加 http://www.nodeclipse.org/updates/gradle-ide-pack/ update site安装下载)。安装后,需要在Gradle(STS)的 Gradle Distribution中指定 Gradle解压后的位置

安装完成后,创建两个Java工程,分别对应war overlay工程和Java扩展工程。在两个工程中根目录下分别创建build.gradle,并在war overlay工程中创建settings.gradle,作为Gradle根项目引用另外的扩展工程。war overlay工程的build.gradle中需要应用 scaldingspoon.gradle.WarOverlayPlugin插件,并依赖另外的java 扩展工程。
build.gradle和 settings.gradle配置好后,将两个工程转为Gradle STS工程即可。
3.3 一个可登录的CAS
这里示例一个使用关系数据库中的用户名和密码登录的CAS服务器的配置和构建(不涉及二次开发)。如果使用war包下载维护的方式开发可以直接跳到3.3.2节配置部分。
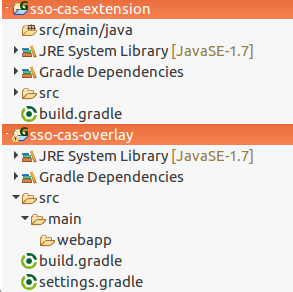
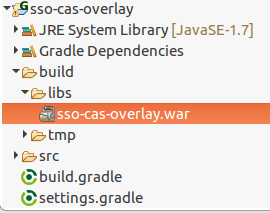
3.3.1 工程结构
按照上述Gradle War Overlay方式建立两个gradle工程,工程结构如下所示:
sso-cas-extension/build.gradle 内容:
apply plugin: 'java'
apply plugin: 'eclipse-wtp'

project.ext {
    casVersion = '4.1.0'
}

compileJava {
    options.encoding = 'utf-8'
}

dependencies {
    compile 'javax.servlet:servlet-api:2.5'
    compile 'org.springframework.security:spring-security-core:4.0.1.RELEASE'

    compile group: 'org.jasig.cas', name: 'cas-server-core-api', version: casVersion
    compile group: 'org.jasig.cas', name: 'cas-server-webapp-support', version: casVersion
}

repositories {
    mavenCentral()
}

eclipse {
    classpath {
        downloadSources = true
        downloadJavadoc = false
    }
    wtp {
        facet {
            facet name: 'jst.utility', version : '1.0'
        }
    }
}
sso-cas-overlay/build.gradle 内容(这里以连接mysql为例):
apply plugin: 'java'
apply plugin: 'eclipse-wtp'
apply plugin: 'war'
apply plugin: scaldingspoon.gradle.WarOverlayPlugin

project.ext {
    casVersion = '4.1.0'
}

compileJava {
    options.encoding = 'utf-8'
}

dependencies {
    providedCompile 'javax.servlet:servlet-api:2.5'
    runtime("org.jasig.cas:cas-server-webapp:${casVersion}@war") {
        transitive = true // setting this to true calculates transitive dependencies for addition to the target WAR
    }

    runtime "mysql:mysql-connector-java:5.1.38" // JDBC Driver

    runtime project(':sso-cas-extension')
}

repositories {
    mavenCentral()
}

warOverlay {
    includeWarJars false // whether to include the jar files in the WAR. Default is false. If false, it might be useful to set transitive to `true` for the WAR dependency so its dependencies will be calculated and added
}

eclipse {
    classpath {
        downloadSources = true
        downloadJavadoc = false
    }
    wtp {
        facet {
            facet name: 'jst.utility', version : '1.0'
        }
    }
}

buildscript {
    repositories {
        jcenter()
    }
    dependencies {
        classpath "org.scaldingspoon.gradle:gradle-waroverlay-plugin:0.9.3"
    }
}
sso-cas-overlay/settings.gradle 内容:
includeFlat 'sso-cas-extension'
工程结构中,sso-cas-overlay/src/main/webapp 下存放的是CAS应用中需要修改或添加的配置及页面等内容,sso-cas-extension/src/main/java 下存放的是后续扩展所需的Java类代码(本示例中不会使用)。
3.3.2 配置修改
为了使这个基本的CAS服务能够运行起来,我们需要在工程中添加修改一些配置。这些配置文件来自CAS WAR包,将这些配置文件拷贝到与原始位置相同的相对路径下,然后修改编辑文件的内容。
基础配置
涉及的配置文件:WEB-INF/cas.properties。
WEB-INF/cas.properties是CAS的重要配置文件,包含了众多properties配置。
WEB-INF/cas.properties 的前两个配置项server.name配置为CAS服务的访问地址(无路径)、server.prefix配置应用访问路径。
配置数据库用户名/密码认证
涉及的配置文件:WEB-INF/deployerConfigContext.xml, WEB-INF/cas.properties
WEB-INF/deployerConfigContext.xml 包含了CAS部署所需的一些常用配置。对该文件进行以下修改:
删除或注释掉bean
id="proxyPrincipalResolver"删除或注释掉bean
id="authenticationManager"中 map的两项 entry添加bean
id="basicPrincipalResolver":<bean id="basicPrincipalResolver" class="org.jasig.cas.authentication.principal.BasicPrincipalResolver" />添加bean
id="dataSource"<bean id="dataSource" class="com.mchange.v2.c3p0.ComboPooledDataSource" p:driverClass="${database.driverClass}" p:jdbcUrl="${database.url}" p:user="${database.user}" p:password="${database.password}" p:initialPoolSize="${database.pool.minSize}" p:minPoolSize="${database.pool.minSize}" p:maxPoolSize="${database.pool.maxSize}" p:maxIdleTimeExcessConnections="${database.pool.maxIdleTime}" p:checkoutTimeout="${database.pool.maxWait}" p:acquireIncrement="${database.pool.acquireIncrement}" p:acquireRetryAttempts="${database.pool.acquireRetryAttempts}" p:acquireRetryDelay="${database.pool.acquireRetryDelay}" p:idleConnectionTestPeriod="${database.pool.idleConnectionTestPeriod}" p:preferredTestQuery="${database.pool.connectionHealthQuery}" />添加bean id=" dbAuthHandler",需要将查询用户密码的SQL放在p:sql属性中,类似如下形式:select login_pass from userlogin where login_name=?
<bean id="dbAuthHandler"
class="org.jasig.cas.adaptors.jdbc.QueryDatabaseAuthenticationHandler"
   p:dataSource-ref="dataSource"
   p:sql="<SQL HERE>" />
添加bean id="authenticationManager" map中的entry:
<entry key-ref="dbAuthHandler" value-ref="basicPrincipalResolver" />
修改 cas.properties,添加用户信息所在的数据库配置,驱动、url、用户名及密码需要手动填写:
# == Basic database connection pool configuration ==
database.driverClass=
database.url=
database.user=
database.password=
database.pool.minSize=6
database.pool.maxSize=18

# Maximum amount of time to wait in ms for a connection to become
# available when the pool is exhausted
database.pool.maxWait=10000

# Amount of time in seconds after which idle connections
# in excess of minimum size are pruned.
database.pool.maxIdleTime=120

# Number of connections to obtain on pool exhaustion condition.
# The maximum pool size is always respected when acquiring
# new connections.
database.pool.acquireIncrement=6

# == Connection testing settings ==

# Period in s at which a health query will be issued on idle
# connections to determine connection liveliness.
database.pool.idleConnectionTestPeriod=30

# Query executed periodically to test health
database.pool.connectionHealthQuery=select 1

# == Database recovery settings ==

# Number of times to retry acquiring a _new_ connection
# when an error is encountered during acquisition.
database.pool.acquireRetryAttempts=5

# Amount of time in ms to wait between successive aquire retry attempts.
database.pool.acquireRetryDelay=2000
按上述配置完成后,可以使用用户名及密码登录,密码使用明文,登录成功后,客户端将获得登录时的登录名。
https、http配置
CAS默认配置下,所有的请求(浏览器请求及CAS客户端发来的验证请求)都是需要使用https配置SSL/TLS证书使用。对于公网浏览器登录请求,可以应该使用CA签发的证书,自签名证书浏览器会出现警告;对于客户端验证请求,内部应用通常会使用内网地址,此时可以用自签名证书,但需要将生成的证书添加到JRE的cacerts中。
如果不想使用https则需要一些配置,则需要修改一些配置,不使用https的情况下,CAS默认的登录页会出现一个警告。
- WEB-INF/web.xml 查找
<security-constraint>标签,去掉该项内容; - WEB-INF/spring-configuration/ticketGrantingTicketCookieGenerator.xml 查找
p:cookieSecure,将该值设为false。
- WEB-INF/web.xml 查找
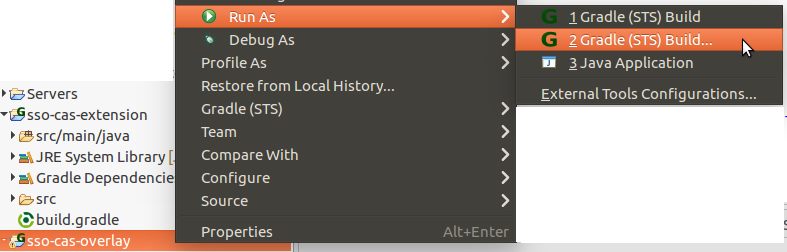
3.3.3 构建部署
对于直接修改war包的方式不需要单独构建,可直接于tomcat下运行。
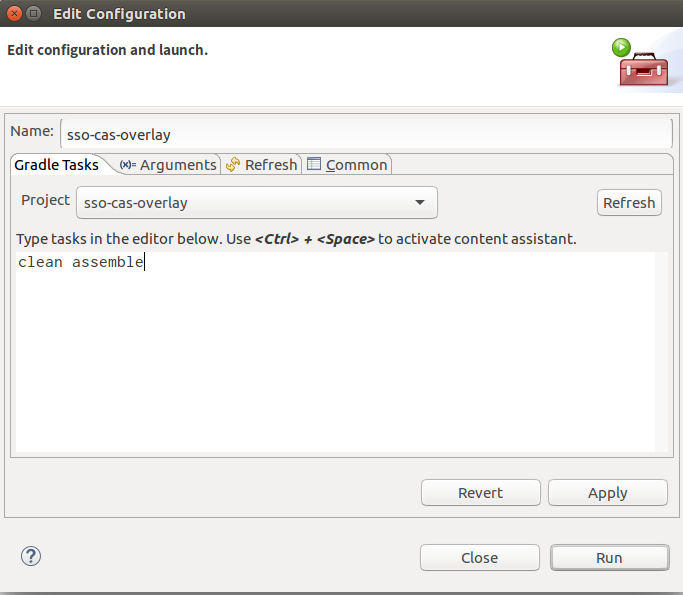
使用war overlay方式执行工具的构建命令生成war包(Java扩展的代码会被自动单独打成jar),将其放到tomcat webapps下作为web应用运行。
直接访问该应用会弹出登录页,登录成功后会跳转到登录成功提示页。
3.4 后续的开发
这里提供一些后续二次开发可能会用到的其他提示,更多信息可以在网站上查找资料了解。
3.4.1 数据库加密密码的认证
CAS本身还提供了org.jasig.cas.adaptors.jdbc.QueryAndEncodeDatabaseAuthenticationHandler对密码进行加密,但用法与原配置的QueryDatabaseAuthenticationHandler用法有所不同。
对于已有的密码存储如果有自己的加密方式,也可以手动继承org.jasig.cas.adaptors.jdbc.AbstractJdbcUsernamePasswordAuthenticationHandler实现自己的用户名密码验证。
修改后需要修改deployerConfigContext.xml。
3.4.2 返回客户端的认证信息
CAS内置的BasicPrincipalResolver会使用登录名返回到客户端应用,如果需要返回其他标识则可以自行实现org.jasig.cas.authentication.principal.PrincipalResolver接口,并配置在deployerConfigContext.xml的authenticationManager中。
3.4.3 页面自定义
CAS服务端使用spring webflow处理cas协议及页面显示。
WebFlow的配置位于WEB-INF/webflow下,下面包含了每个流程的配置,这些配置在不添加登录方式的情况下可以不用修改。
页面模板位于WEB-INF/view/jsp下,default为默认主题的ui页面,default/ui/LoginView.jsp为默认登录页。
第4章 CAS客户端集成
下面介绍UniEAP Report作为客户端如何与CAS服务做集成。
4.1 UniEAP Report客户端应用信息
所有的CAS客户端应用默认情况下都需要在CAS服务端注册一些信息才能够对接CAS,这样能够保证用户信息安全性,UniEAP Report应用也不例外。
CAS 4.1.0版本默认的注册方式是在CAS WEB-INF/classes/services下使用json文件注册。每个文件对应一个客户端,其内容大致如下:
{
    "@class" : "org.jasig.cas.services.RegexRegisteredService",
    "id" : 18,
    "description" : "报表应用",
    "serviceId" : "http://10.4.45.105:8081/report/.*",
    "name" : "analysis service",
    "accessStrategy" : {
        "@class" : "org.jasig.cas.services.DefaultRegisteredServiceAccessStrategy",
        "enabled" : true,
        "ssoEnabled" : true
    },
    "evaluationOrder" : 1003,
    "usernameAttributeProvider" : {
        "@class" : "org.jasig.cas.services.DefaultRegisteredServiceUsernameProvider"
    },
    "attributeReleasePolicy" : {
        "@class" : "org.jasig.cas.services.ReturnAllAttributeReleasePolicy"
    },
    "logoutType" : "BACK_CHANNEL"

}
其中,
id是唯一标识数字,不能重复
serviceId是客户端应用的标识地址,会由URL中service参数传递过来的地址进行匹配,只要匹配了该地址即可以按照该应用身份进行处理。可以使用应用一级地址的通配符标识。
name及description是名称和描述信息
enabled和ssoEnabled需要设置为
true,才能够通过该应用的认证请求。logoutType 用于处理单点登出(SLO),默认BACK_CHANNEL使用后端登出(CAS服务端向客户端应用发SLO登出请求),FRONT_CHANNEL使用前端登出(取决于CAS版本,通过HTTP 302跳转或JSONP Ajax请求),设置为NONE则不使用单点登出。
另外CAS也提供了一个独立的CAS管理应用以图形方式管理CAS的客户端应用,可以参考https://apereo.github.io/cas-management 进行安装使用,本文不做详述。
如果以上的方式不能满足需求,则需要进行手动扩展。
4.2 UniEAP Report应用集成
CAS本身提供了Java客户端,Spring Security 也提供了CAS单点登录支持,因此两者可以较容易地集成在一起。(UniEAP Report就是采用的这种集成方式)
4.2.1 准备
在UniEAP Report应用中,需要依赖以下两个组件(以4.0.1版本SpringSecurity为例):
org.springframework.security:spring-security-cas:4.0.1.RELEASE
org.jasig.cas.client:cas-client-core:3.4.1
将这两个jar下载下来,放入报表应用WEB-INF/lib 下。
4.2.2 登录流程处理
编写集成实现类
编写一个实现类,实现
org.springframework.security.core.userdetails.UserDetailsService中的方法,该方法接收一个username(用户唯一标识,由CAS认证成功后返回),返回一个包含ROLE_USER权限的com.neusoft.saca.dataviz.common.security.UserDetailExt对象,该接口继承了org.springframework.security.core.userdetails.UserDetails接口。(如果需要使用公共项目管理员功能,需要对管理员用户额外添加ROLE_ADMIN权限)将该类打包放入WEB-INF/lib 下。示例代码如下(可直接使用):
import org.springframework.security.core.GrantedAuthority;
import org.springframework.security.core.authority.SimpleGrantedAuthority;
import org.springframework.security.core.userdetails.UserDetails;
import org.springframework.security.core.userdetails.UserDetailsService;

import com.neusoft.saca.dataviz.common.security.DefaultUser;

public class SampleUserDetailService implements UserDetailsService {


  @Override
    public UserDetails loadUserByUsername(String username) {
// 根据username或去用户信息,可以根据当前用户的信息判断是否为管理员,如果是管理员,userId为用户ID
        // return new DefaultUser(userId, "",new //SimpleGrantedAuthority("ROLE_ADMIN"));
        return new DefaultUser(userId, “”);
    }
}
添加新的AuthenticationEntryPoint 实现类,代码如下:
import java.io.IOException;

import javax.servlet.ServletException;
import javax.servlet.http.HttpServletRequest;
import javax.servlet.http.HttpServletResponse;

import org.jasig.cas.client.util.CommonUtils;
import org.springframework.beans.factory.InitializingBean;
import org.springframework.security.cas.ServiceProperties;
import org.springframework.security.core.AuthenticationException;
import org.springframework.security.web.AuthenticationEntryPoint;
import org.springframework.util.Assert;

public class CasAuthenticationEntryPointWithAjaxSupport implements
        AuthenticationEntryPoint, InitializingBean {
    // ~ Instance fields
    // ================================================================================================
    private ServiceProperties serviceProperties;

    private String loginUrl;

    /**
     * Determines whether the Service URL should include the session id for the specific
     * user. As of CAS 3.0.5, the session id will automatically be stripped. However,
     * older versions of CAS (i.e. CAS 2), do not automatically strip the session
     * identifier (this is a bug on the part of the older server implementations), so an
     * option to disable the session encoding is provided for backwards compatibility.
     *
     * By default, encoding is enabled.
     */
    private boolean encodeServiceUrlWithSessionId = true;

    // ~ Methods
    // ========================================================================================================

    public void afterPropertiesSet() throws Exception {
        Assert.hasLength(this.loginUrl, "loginUrl must be specified");
        Assert.notNull(this.serviceProperties, "serviceProperties must be specified");
        Assert.notNull(this.serviceProperties.getService(),
                "serviceProperties.getService() cannot be null.");
    }

@Override
    public final void commence(final HttpServletRequest servletRequest,
            final HttpServletResponse response,
            final AuthenticationException authenticationException) throws IOException,
            ServletException {

        if (isAjaxRequest(servletRequest)) {
            response.setStatus(HttpServletResponse.SC_UNAUTHORIZED);
        } else {
            final String urlEncodedService = createServiceUrl(servletRequest, response);
            final String redirectUrl = createRedirectUrl(urlEncodedService);

            preCommence(servletRequest, response);

            response.sendRedirect(redirectUrl);
        }
    }

    protected boolean isAjaxRequest(final HttpServletRequest servletRequest) {
        String xRequestedWith = servletRequest.getHeader("X-Requested-With");
        return xRequestedWith != null && xRequestedWith.trim().length() > 0;
    }

    /**
     * Constructs a new Service Url. The default implementation relies on the CAS client
     * to do the bulk of the work.
     * @param request the HttpServletRequest
     * @param response the HttpServlet Response
     * @return the constructed service url. CANNOT be NULL.
     */
    protected String createServiceUrl(final HttpServletRequest request,
            final HttpServletResponse response) {
        return CommonUtils.constructServiceUrl(null, response,
                this.serviceProperties.getService(), null,
                this.serviceProperties.getArtifactParameter(),
                this.encodeServiceUrlWithSessionId);
    }

    /**
     * Constructs the Url for Redirection to the CAS server. Default implementation relies
     * on the CAS client to do the bulk of the work.
     *
     * @param serviceUrl the service url that should be included.
     * @return the redirect url. CANNOT be NULL.
     */
    protected String createRedirectUrl(final String serviceUrl) {
        return CommonUtils.constructRedirectUrl(this.loginUrl,
                this.serviceProperties.getServiceParameter(), serviceUrl,
                this.serviceProperties.isSendRenew(), false);
    }

    /**
     * Template method for you to do your own pre-processing before the redirect occurs.
     *
     * @param request the HttpServletRequest
     * @param response the HttpServletResponse
     */
    protected void preCommence(final HttpServletRequest request,
            final HttpServletResponse response) {

    }

    /**
     * The enterprise-wide CAS login URL. Usually something like
     * <code>https://www.mycompany.com/cas/login</code>.
     *
     * @return the enterprise-wide CAS login URL
     */
    public final String getLoginUrl() {
        return this.loginUrl;
    }

    public final ServiceProperties getServiceProperties() {
        return this.serviceProperties;
    }

    public final void setLoginUrl(final String loginUrl) {
        this.loginUrl = loginUrl;
    }

    public final void setServiceProperties(final ServiceProperties serviceProperties) {
        this.serviceProperties = serviceProperties;
    }

    /**
     * Sets whether to encode the service url with the session id or not.
     *
     * @param encodeServiceUrlWithSessionId whether to encode the service url with the
     * session id or not.
     */
    public final void setEncodeServiceUrlWithSessionId(
            final boolean encodeServiceUrlWithSessionId) {
        this.encodeServiceUrlWithSessionId = encodeServiceUrlWithSessionId;
    }

    /**
     * Sets whether to encode the service url with the session id or not.
     * @return whether to encode the service url with the session id or not.
     *
     */
    protected boolean getEncodeServiceUrlWithSessionId() {
        return this.encodeServiceUrlWithSessionId;
    }
}
修改 applicationContext-security.xml
该文件位于 WEB-INF/conf/spring/applicationContext-security.xml,包含了全部Spring Security登录验证等相关内容的配置。
删除以下相关内容:
<http use-expressions="true" entry-point-ref="authenticationEntryPoint"> … </http><http pattern="/unieap/pages/**" security="none" />
增加以下内容,并将其中的
CasAuthenticationEntryPointWithAjaxSupport以及casUserDetailService替换为之前添加的实现类:
    <http use-expressions="true" entry-point-ref="casEntryPoint" create-session="ifRequired">
        <csrf disabled="true" />
        <intercept-url pattern="/**" access="hasRole('USER')" />
        <logout invalidate-session="true" success-handler-ref="logoutSuccessHandler" />
        <session-management session-fixation-protection="none"></session-management>
        <custom-filter position="CAS_FILTER" ref="casFilter" />
        <custom-filter ref="requestSingleLogoutFilter" before="LOGOUT_FILTER"/>
        <custom-filter ref="singleLogoutFilter" before="CAS_FILTER"/>
        <access-denied-handler ref="accessDeniedHandler"></access-denied-handler>
    </http>


    <beans:bean id="casPropertyConfigurer"
    class="org.springframework.beans.factory.config.PropertyPlaceholderConfigurer">
        <beans:property name="ignoreUnresolvablePlaceholders" value="true" />
        <beans:property name="locations">
            <beans:list>
                <beans:value>WEB-INF/conf/cas.properties</beans:value>
            </beans:list>
        </beans:property>
    </beans:bean>

    <beans:bean id="serviceProperties"
        class="org.springframework.security.cas.ServiceProperties">
        <beans:property name="service" value="${sso.cas.localServer}${sso.cas.localServicePath}" />
        <beans:property name="sendRenew" value="false" />
    </beans:bean>

    <beans:bean id="casEntryPoint"
        class="CasAuthenticationEntryPointWithAjaxSupport 完整类名">
        <beans:property name="loginUrl" value="${sso.cas.casServer}/login" />
        <beans:property name="serviceProperties" ref="serviceProperties" />
    </beans:bean>

    <beans:bean id="casFilter"
        class="org.springframework.security.cas.web.CasAuthenticationFilter">
        <beans:property name="authenticationManager" ref="authenticationManager" />
        <beans:property name="authenticationSuccessHandler">
            <beans:bean class="org.springframework.security.web.authentication.SavedRequestAwareAuthenticationSuccessHandler">
                <beans:property name="defaultTargetUrl" value="${sso.cas.defaultTargetRedirect}" />
                <beans:property name="targetUrlParameter" value="target" />
            </beans:bean>
        </beans:property>
    </beans:bean>

    <beans:bean id="casAuthenticationProvider"
        class="org.springframework.security.cas.authentication.CasAuthenticationProvider">
        <beans:property name="authenticationUserDetailsService">
            <beans:bean
                class="org.springframework.security.core.userdetails.UserDetailsByNameServiceWrapper">
                <beans:constructor-arg ref="casUserDetailService" />
            </beans:bean>
        </beans:property>
        <beans:property name="serviceProperties" ref="serviceProperties" />
        <beans:property name="ticketValidator">
            <beans:bean class="org.jasig.cas.client.validation.Cas20ServiceTicketValidator">
                <!-- server URL prefix -->
                <beans:constructor-arg index="0" value="${sso.cas.casServerLocal}" />
            </beans:bean>
        </beans:property>
        <beans:property name="key" value="bonjour!" />
    </beans:bean>

    <beans:bean id="singleLogoutFilter" class="org.jasig.cas.client.session.SingleSignOutFilter">
        <beans:property name="casServerUrlPrefix" value="${sso.cas.casServer}" />
    </beans:bean>

    <beans:bean id="requestSingleLogoutFilter"
        class="org.springframework.security.web.authentication.logout.LogoutFilter">
        <beans:constructor-arg value="${sso.cas.casServer}/logout?service=${sso.cas.localServer}"/>
        <beans:constructor-arg>
            <beans:bean class=
                "org.springframework.security.web.authentication.logout.SecurityContextLogoutHandler"/>
        </beans:constructor-arg>
        <beans:property name="filterProcessesUrl" value="${sso.cas.localLogoutPath}"/>
    </beans:bean>

    <beans:bean id="casUserDetailService" class="UserDetails完整实现类名" />
查找 <authentication-manager alias="authenticationManager">标签,将改成如下形式:
    <authentication-manager alias="authenticationManager">
        <authentication-provider ref="casAuthenticationProvider" />
    </authentication-manager>
检查其中其他对authenticationEntryPoint bean的引用,将 authenticationEntryPoint 改为 casEntryPoint。
- 添加cas.properties
于 WEB-INF/conf 下,添加 cas.properties 文件。参考以下内容。
# cas 服务访问地址
sso.cas.casServer=https://sso.local-example.org:8443/cas

# cas 服务内部地址,用于内部验证通信,当仅在内网使用或没有内外网隔离时可与外部访问地址相同
sso.cas.casServerLocal=https://sso.local-example.org:8443/cas

# Report 应用访问地址
sso.cas.localServer=http://www.local-example.org:8080/report

# Report 登录地址,不用修改
sso.cas.localServicePath=/login/cas

# Report 登出地址,不用修改
sso.cas.localLogoutPath=/logout/cas

# Report 前台访问地址
sso.cas.defaultTargetRedirect=http://www.local-example.org:8080/report/unieap/pages/platform/src/index.html
- 修改 /WEB-INF/web.xml,添加如下内容
<listener-class>
    org.jasig.cas.client.session.SingleSignOutHttpSessionListener
</listener-class>
4.2.3 登录用户集成
用户集成在Report中主要是用作权限管理等功能,这些功能需要实现用户管理的接口。在登录集成中略过该步骤不会影响Report核心功能使用。详细内容可参见系统集成文档。
4.2.4 前台登录跳转
修改前台 report/WebContent/unieap/pages/platform/common/config.js文件,添加以下变量值:
// cas登录地址
window.cas_server = "https://sso.local-example.org:8443/cas";
// cas服务回调地址
window.cas_callback_server = "?service=http://www.local-example.org:8080/report";
// 是否使用cas登录
window.isCasLogin = true;
4.2.5 eclipse版报表设计器集成
UniEAP Report报表服务集成完以后,还需要处理eclipse版报表设计器连接引擎的认证问题。
编写集成实现类
编写一个实现类,实现
com.neusoft.report.engine.security.SecurityFactory中的方法,将该类打包放入WEB-INF/lib 下。示例代码如下(可直接使用):
import com.neusoft.report.engine.security.AppSecurity;
import com.neusoft.report.engine.security.SecurityFactory;

public class SimpleDataVizAppSecurityFactory implements SecurityFactory {

    public AppSecurity getNewSecurity() {
        return new SimpleDataVizAppSecurity();
    }

}
编写集成实现类
编写一个实现类SimpleDataVizAppSecurity, 实现com.neusoft.report.engine.security.AppSecurity中的方法,和com.neusoft.report.dataset.util.UserLookUp中的方法,将该类打包放入WEB-INF/lib 下。
示例代码如下:
import java.security.MessageDigest;
import java.sql.Connection;
import java.sql.DriverManager;
import java.sql.PreparedStatement;
import java.sql.ResultSet;
import java.sql.SQLException;
import java.util.Arrays;
import java.util.Iterator;

import javax.servlet.http.HttpServletRequest;
import javax.servlet.http.HttpSession;

import org.apache.axis.MessageContext;
import org.apache.axis.transport.http.HTTPConstants;
import org.apache.commons.codec.binary.Hex;
import org.springframework.security.authentication.AuthenticationProvider;
import org.springframework.security.authentication.UsernamePasswordAuthenticationToken;
import org.springframework.security.core.Authentication;
import org.springframework.security.core.GrantedAuthority;
import org.springframework.security.core.authority.SimpleGrantedAuthority;
import org.springframework.security.core.context.SecurityContext;
import org.springframework.security.core.context.SecurityContextHolder;
import org.springframework.security.core.userdetails.UserDetails;
import org.springframework.security.crypto.bcrypt.BCryptPasswordEncoder;

import com.neusoft.report.common.Logger;
import com.neusoft.report.commonbase.util.LRUCache;
import com.neusoft.report.dataset.util.UserLookUp;
import com.neusoft.report.engine.security.AppSecurity;
import com.neusoft.report.engine.security.Security;
import com.neusoft.saca.dataviz.common.security.DefaultUser;
import com.neusoft.saca.dataviz.common.security.SecurityUtil;

public class SimpleDataVizAppSecurity implements AppSecurity, UserLookUp {

    private static AuthenticationProvider provider;

    private LRUCache cache = new LRUCache(20, 900000);

    private String jdbcUrl = "jdbc:mysql://10.4.45.105:3306/report?characterEncoding=utf8";

    private String userName = "root";

    private String password = "root";

    private String driverClass = "com.mysql.jdbc.Driver";

    public void setAuthenticationProvider(AuthenticationProvider provider) {
        SimpleDataVizAppSecurity.provider = provider;
    }

    public void setSecurity(Security security) {
        // Nothing.
    }

    public String getCurrentUserId() {
        return SecurityUtil.getCurrentUserId();
    }

    public String getCurrentUserId(HttpServletRequest request) {
        Logger logger = Logger.getLogger(SimpleDataVizAppSecurity.class);
        HttpSession session = null;
        String userId = null;
        Object principal = null;
        if (request != null && (session = request.getSession(false)) != null) {
            principal = session.getAttribute("principal");

            if (principal instanceof UserDetails) {
                userId = ((UserDetails) principal).getUsername();

            }
            if (principal instanceof String) {
                userId = String.valueOf(principal);
                principal = new DefaultUser(userId, "");
            }
        }

        if (userId == null) {
            logger.warn("CurrentUserId is null.");
        }
        return userId;
    }

    @SuppressWarnings("rawtypes")
    public Iterator getRolesByUser(String userId) {
        return null;
    }

    public boolean isAdmin(String userId) {
        return false;
    }

    public boolean login(String userName, String password) {//需要实现:设计器认证时使用
        Logger logger = Logger.getLogger(SimpleDataVizAppSecurity.class);
        MessageContext mc = MessageContext.getCurrentContext();
        HttpServletRequest request = (HttpServletRequest) mc
                .getProperty(HTTPConstants.MC_HTTP_SERVLETREQUEST);

        try {
            if ((userName != null) && (request != null)) {

                BCryptPasswordEncoder passwordEncoder = new BCryptPasswordEncoder();

                MessageDigest messageDigest = MessageDigest.getInstance("SHA-256");
                byte[] hash = messageDigest.digest(password.getBytes("UTF-8"));
                String encdeStr = Hex.encodeHexString(hash);

                String sql = "select login_pass from dv_userlocallogin t where t.login_name = ?";
                String encodedPassword = getValueFromTBX(userName.trim(),sql,"login_pass");

                if (passwordEncoder.matches(encdeStr, encodedPassword)) {
                    String userid_sql = "select user_id from dv_userlocallogin t where t.login_name = ?";
                    String uid = getValueFromTBX(userName.trim(),userid_sql,"user_id");

                    SecurityContext context = SecurityContextHolder.createEmptyContext();
                    Authentication auth = new UsernamePasswordAuthenticationToken(uid,"", Arrays.asList(new GrantedAuthority[] {new SimpleGrantedAuthority("ROLE_USER")}));
                    context.setAuthentication(auth);
                    SecurityContextHolder.setContext(context);

                    return true;
                }
            }

            return false;
        } catch (Exception e) {
            logger.error(e);
            return false;
        }
    }

    public boolean login(String userName, String password, HttpServletRequest request) {//需要实现:设计器预览时使用
        Logger logger = Logger.getLogger(SimpleDataVizAppSecurity.class);
        try {

            if ((userName != null) && (request != null)) {

                BCryptPasswordEncoder passwordEncoder = new BCryptPasswordEncoder();

                MessageDigest messageDigest = MessageDigest.getInstance("SHA-256");
                byte[] hash = messageDigest.digest(password.getBytes("UTF-8"));
                String encdeStr = Hex.encodeHexString(hash);

                String sql = "select login_pass from dv_userlocallogin t where t.login_name = ?";
                String encodedPassword = getValueFromTBX(userName.trim(),sql,"login_pass");

                if (passwordEncoder.matches(encdeStr, encodedPassword)) {
                    String userid_sql = "select user_id from dv_userlocallogin t where t.login_name = ?";
                    String uid = getValueFromTBX(userName.trim(),userid_sql,"user_id");

                    SecurityContext context = SecurityContextHolder.createEmptyContext();
                    Authentication auth = new UsernamePasswordAuthenticationToken(uid,"", Arrays.asList(new GrantedAuthority[] {new SimpleGrantedAuthority("ROLE_USER")}));
                    context.setAuthentication(auth);
                    SecurityContextHolder.setContext(context);

                    return true;
                }
            }
        } catch (Exception e) {
            logger.error(e);
            request.getSession().invalidate();
            return false;
        }
        request.getSession().invalidate();
        return false;
    }

    public boolean isLogin(String userName, HttpServletRequest request) {
        HttpSession session = request.getSession(false);
        if (session == null) {
            return false;
        }

        Object principal = request.getSession().getAttribute("principal");
        if (principal == null) {
            return false;
        }

        String uid = principal instanceof UserDetails ? ((UserDetails) principal)
                .getUsername() : String.valueOf(principal);

        return uid.equals(getLoginUserId(userName));
    }

    public String getLoginUserId(String loginId) {//需要实现,登录用户与用户id关联
        String uid = null;
        synchronized (cache) {
            uid = (String) cache.get(loginId);

            if (uid == null) {
                String sql = "select user_id from dv_userlocallogin t where t.login_name = ?";
                uid = getValueFromTBX(loginId,sql,"user_id");

                if (uid != null) {
                    cache.put(loginId, uid);
                }
            }
        }
        return uid == null ? loginId : uid;
    }

    public String getUserId(String loginName) {
        return this.getLoginUserId(loginName);
    }

    private String getValueFromTBX(String loginId,String sql,String name) {
        Connection conn = null;
        PreparedStatement pstmt = null;
        ResultSet rs = null;
        try {
            Class.forName(driverClass);
            conn = DriverManager.getConnection(jdbcUrl, userName, password);
            pstmt = conn.prepareStatement(sql);
            pstmt.setString(1, loginId);
            rs = pstmt.executeQuery();
            return rs != null && rs.next() ? rs.getString(name) : null;

        } catch (Exception e) {
            System.out.println("Connection Exception !");
        } finally {
            if (rs != null) {
                try {
                    rs.close();
                } catch (SQLException e) {
                    e.printStackTrace();
                }
            }
            if (pstmt != null) {
                try {
                    pstmt.close();
                } catch (SQLException e) {
                    e.printStackTrace();
                }
            }
            if (conn != null){
                try {
                    conn.close();
                } catch (SQLException e) {
                    e.printStackTrace();
                }
            }
        }

        return null;
    }

}
修改report-engine-config.properties中的如下配置
com.neusoft.report.engine.security.factory=SimpleDataVizAppSecurityFactory完整实现类名